Saturday, August 13, 2011

Fireplace and floor....

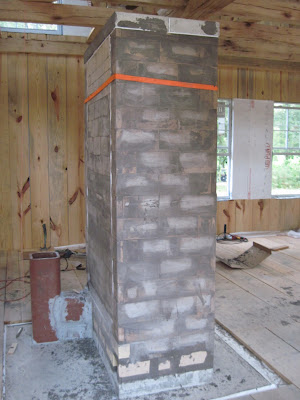
After two 200 mile round trips to get bricks and hours and hours and hours of perfecting the science of refractory cement and then brick mortar, the fireplace is done up to the ceiling of the first floor. We've still got to carry the chimney up past that, but what a relief! I think he did such a wonderful job. Our old one in our previous home didn't have a bake oven like this one.


I can just imagine coming downstairs this winter and leaning on those bricks. I have missed that while we've been in the barn. You just can't lean on an electric wall heater. The fireplace faces the living room.


Time for more floors! As usual, there were lots of options. We had initially planned to use some of the wood we'd had milled off our place for the floors, but it ended that oak took forever to plane with our planer and the local sawmill just doesn't have time for it right now. My husband saw this fir at Lowe's and got it. We used 2x4's and did one layer, wedging them tight and applying sealer between them. It's just beautiful and I think it will work out really well. This is what we're doing for the second floor. There is some tongue and groove post oak that my husband can't quite get out of his mind, and I predict we end up going with that or taking the time to plane our own for the first floor.


It's neat to see the areas taking shape rather than it being one big room up to the attic. This one is the kitchen.


Here are the stairs roughed in. My husband used a plan he found in a book about building stairs to get the same shape as the one in Jack Sobon's book. This is really the only staircase that fits in the stairwell space, but I really like the lines and angles of it.


This one is the view from the front of the house.


You can see the side of the fireplace that faces the kitchen here, before the stairs were built.


We're getting there one step at a time.

Monday, July 11, 2011

Slow but steady...in the middle of the masonry heater

This is some fabric I found a while back at Walmart, and it just goes with the house. I found the coordinating print below online. I plan to use them as curtains and whatnot in the kitchen.


My husband left his work hat on a peg, and I just thought it made a neat looking shot.


Here we are....actual progress on the house. You can see all the layers up to the subfloor here.


Time to start laying out the masonry heater components. He actually built one for our first home, but this plan is a little bit different. We were able to get the concrete supplies locally, but we ordered the iron pieces from North Stone Heat. We were very pleased with their customer service.


Take a step back to see the whole picture at this point.


These pictures didn't upload in my order, but here is one from just before he started putting the masonry heater up.


In these you can get a better idea of the space and layout since the subfloor is done. This is looking from the stairwell toward the kitchen and side door. There will be a wall just to the left of the door that comes out about 10 feet which will run behind the stove, refrigerator, and some of the cabinets. On the door-side of it, we plan to put shallow cabinets and a place where workboots and jackets can be stored. To the right of the door will be a small half-bath, the hot water heater, and the washer and dryer.


Before he could start putting the heater together, he had to make some slabs with these forms. We used Spargun 28 and 30, I believe. You can't see it here, but one of them has a hole in the center. It cracked the first time he poured it, but the second time he used a foam piece in the center, and it did just fine.


Starting to lay the firebrick. It's a really neat technique to laying these. You make a pretty runny mortar and then dip the bricks in it before sticking them in place.


In this one you can see where the chimney connects and how the channels are layed out.


These two inspect everything that goes into the house.


Looking at the fireplace from the front door. It's about 4 feet across and I think around 2 feet deep.


The front faces the living room. The top opening will be a bake oven. How cool is that! As the wife and not the one actually building it, I can say that. In this one you can see how the firebox has a slanted base to make the ash drain better.


Inspector #2 gave it her okay. You can see the color of the brick that will be on the outside. It's from Acme--Boston Red.


The butterfly was hanging out around the fireplace and let me get so close. There was something about the mortar it liked.


Here's our stove! This is not actually ours, but a picture I found of one just like it. My husband found one on Craigslist not far from here. I got online to research the company--It's a Country Charm electric stove from House of Webster. They made these modern stoves inside an 1875 cast iron design from the late 1970's until 2001. I spoke with the company and we can get any parts we need, so we went ahead and got it for a super deal today. The ventahood is hidden by what looks like warmers, and the coffee grinder is the clock/timer. The dials are hidden by the cast iron covers on the left side. It's not the smooth surface, self-cleaning model I was looking at, but we both fell in love with this one. And since I've never had a smooth surface one, I won't miss it. And it is sturdy, weighing around 375 lbs. I think it will be perfect in the house.

Anyway, there's a quick catch up on our progress--we're getting there slowly but surely!

Thursday, May 19, 2011

Interior paint thoughts....

On the Behr site, you can play around with the colors on either sample photos or your own uploaded pics. I was up way too late last night experimenting with different colors and shades for the kitchen and the living room. Since this is all one open space, I need to choose to choose colors that go well for the whole thing. We'd been thinking we'd leave the walls a natural color downstairs, but now we're leaning toward painting the walls and window frames but leaving the beams and braces and ceiling the natural wood color. Here are my favorites so far. I used the sample photos from their site since we don't have the window framing and other trim up, so ours won't be just like this, but it's generally how I would do the same colors. Our rooms won't look near as polished and will be simple wood paneling with battens. Our ceilings won't be painted, either. At least I don't think so at this point.


Paint, paint, and one more coat of paint!

Haven't posted in several weeks. You can only write so much about white paint, and that is what we have been up to our ears (actually higher than that, 28 feet up, to be exact) in. We decided to go with Behr Premium Plus, not the ultra, though. We used pure white, and it took three coats, including the primer, on our wood. With just the two of us, and my dad when he could, and a month of intermittent rain, it's taken us longer than we'd hoped, but it turned out so good! And yesterday after we finished and I'd changed hats and was trying to decide what to cook for supper, my husband suggested we eat out to celebrate the end of white paint. That's one of my favorite perks for being a house builder's assistant.


So, we finished the exterior painting and went on to the doors before our arms got too stiff. In my mind, I've seen a white house with red doors. On a tour of historic homes a while back, we learned that a red door symbolized a welcome, and I like that idea, and the color, too. We got the first coat on yesterday and plan to get the second on today, weather permitting. It's looking kinda cloudy right now, so I've got to check accuweather.


As for the inside, my husband has the masonry heater up to floor level. He poured the concrete for the pad the week before last, if I recall correctly. He ordered the doors and hardware from a company in Washington, North Stone Heat Supply. They had what we wanted at a good price. The doors are beautiful.


So, what are we up to next? I believe subfloors and insulation are on the immediate agenda. It's not near done, yet, but the completion of each step puts us that much closer.


Friday, March 25, 2011

The siding is done!

This week, the weather was very cooperative, and the siding is now finished! It's weird how after looking at the pictures in the book for so long it just looks so familiar to us now that it's here in the flesh, so to speak. I just love it.


Yesterday, we tested out some paint from Home Depot, Behr ultra premium plus, in ultra pure white. After letting one coat dry, it did look great, and there was just a miniscule difference after two coats. While I can't say this is always the case, we've been very fortunate for find someone in the paint dept. at our local Home Depot who really does know paint and has offered us a lot of helpful information. One thing she pointed out is that we need to wait until after Easter to paint so that the pollen won't be such an issue. It's hard to wait, but there are plenty of other things we can get to work on in the meantime. Speaking of paint, Behr has a really neat virtual painting center that you can upload your own pictures to and try out different paint colors on. Go to Behr.com and then go to the explore color tab and click on launch ColorSmart. Of course, the screen skews it some, but it was nice for getting ideas. We have just about decided for sure on white with a barn red door. At some point, we want to do phase 2 and add a big porch, and in my mind I can just see an old fashioned white farmhouse.


This tree stands in our front yard. I'm trying to get photos of it in all four seasons to have as a framed set in the house.


Thursday, March 10, 2011

More siding!

The siding is about at the halfway point.
It just takes time to measure everything just right and get it nailed up. But it's turning out really well, I think. It's good to get to help with this part, too. My husband was able to talk with someone knowledgeable about painting issues, and she suggested waiting till after Easter to paint to avoid pollen situations. She said if we paint over the pollen, we could end up with mold, and pollen in the air could catch in the wet paint, too. That gives us a nice cushion for finishing the siding, but I know my husband wants to be done with it way before then. We're planning to paint it white with barn red doors. I don't want shutters, as I have come to think the beauty of this style is the symmetry and simplicity, and I think excessive trim can take away from that in this case.
Don't look closely at how much work I need to do in my flower beds--next week is spring break, and that's one of my big projects--but I like how the pictures of our construction are dated by the trees and plants around the house. The photo on the left is my first iris of the season, and in the one on the right, you can see the buds on the tree limb.


Here you can see the west side finished. My dad was able to come a couple of days that week, and he helped a ton.
This week, we sure learned the importance of helpful customer service. We'd ordered our next batch of stainless siding nails, but I (yes, I am claiming responsibility for this one) somehow put the wrong shipping address. When we realized our error, it was too late to change the order. Everything worked out, though, thanks to a seller who was easily available by phone to get us a tracking number and a post office that was willing to locate and hold our box for us till I could get up there. I did get tickled at the postal worker who brought out the box. She didn't know what was in it, and to her it just sounded like something in a lot of pieces. I assured her it was fine. Since we can't find these nails near here, and our first order was almost gone, getting these nails was a big deal.

So, that's where we're at, and I think next up after the exterior we'll start working on the masonry heater inside.


Thursday, February 24, 2011

Time for the siding....

These loaded out of order, but this week has been an exciting one for us. There is still so much to do, but it is good to be to the point of putting on the exterior siding. My husband made a story pole, a new term for me--it's a long piece of wood with marks for how far apart the boards should be nailed in order to come out right. Then he marked where each board will go on the house. That's how I got to help; I can follow marks already laid out for me.

After envisioning the end result in our minds for so long and seeing our piles of boards waiting, each one we nailed on just seemed so beautiful to me. Our plan is to paint the outside white with a barn red door.


Last year, I'd stopped on the side of the road near here and dug up some jonquil bulbs. We planted them in all our beds, and here is the first bloom. Like so many of pictures of framing phase in the autumn, this picture can be dated by our first bloom of springtime approaching.


Like I said, these are a bit out of order. My dad was able to spend all last Saturday with us helping, and he is excellent help to have around. They got the long pieces of trim on the corners and the trim around the base of the house. These pieces just frame the house so beautifully.


We've still got a long way to go, but each step of progress is one more closer to moving in. Once we get the outside done, it'll be time to head inside and get started on the masonry heater. As for my work, I'm working on biscuit quilts for the bedrooms (the pictures on the pattern below don't do them justice, but it's the best I can find online). I have almost 400 small pillows to make, and I'm 10% there now. I found some very easy to understand directions, and I'm just taking them a step at a time.
I've found a wonderful site with diy furniture plans, ana-white.com . She has just the farmhouse table and benches I want (as well as several other pieces), and I've just about worked up my nerve to commit to making them myself. Actually, my husband has offered his skill and help, and my sister her full but misplaced confidence in my abilities, so I think we can do it. Wouldn't that be cool, to make the kitchen table and have just what I want? Anyway, there's our latest! Hopefully, there will be lots more to post soon!